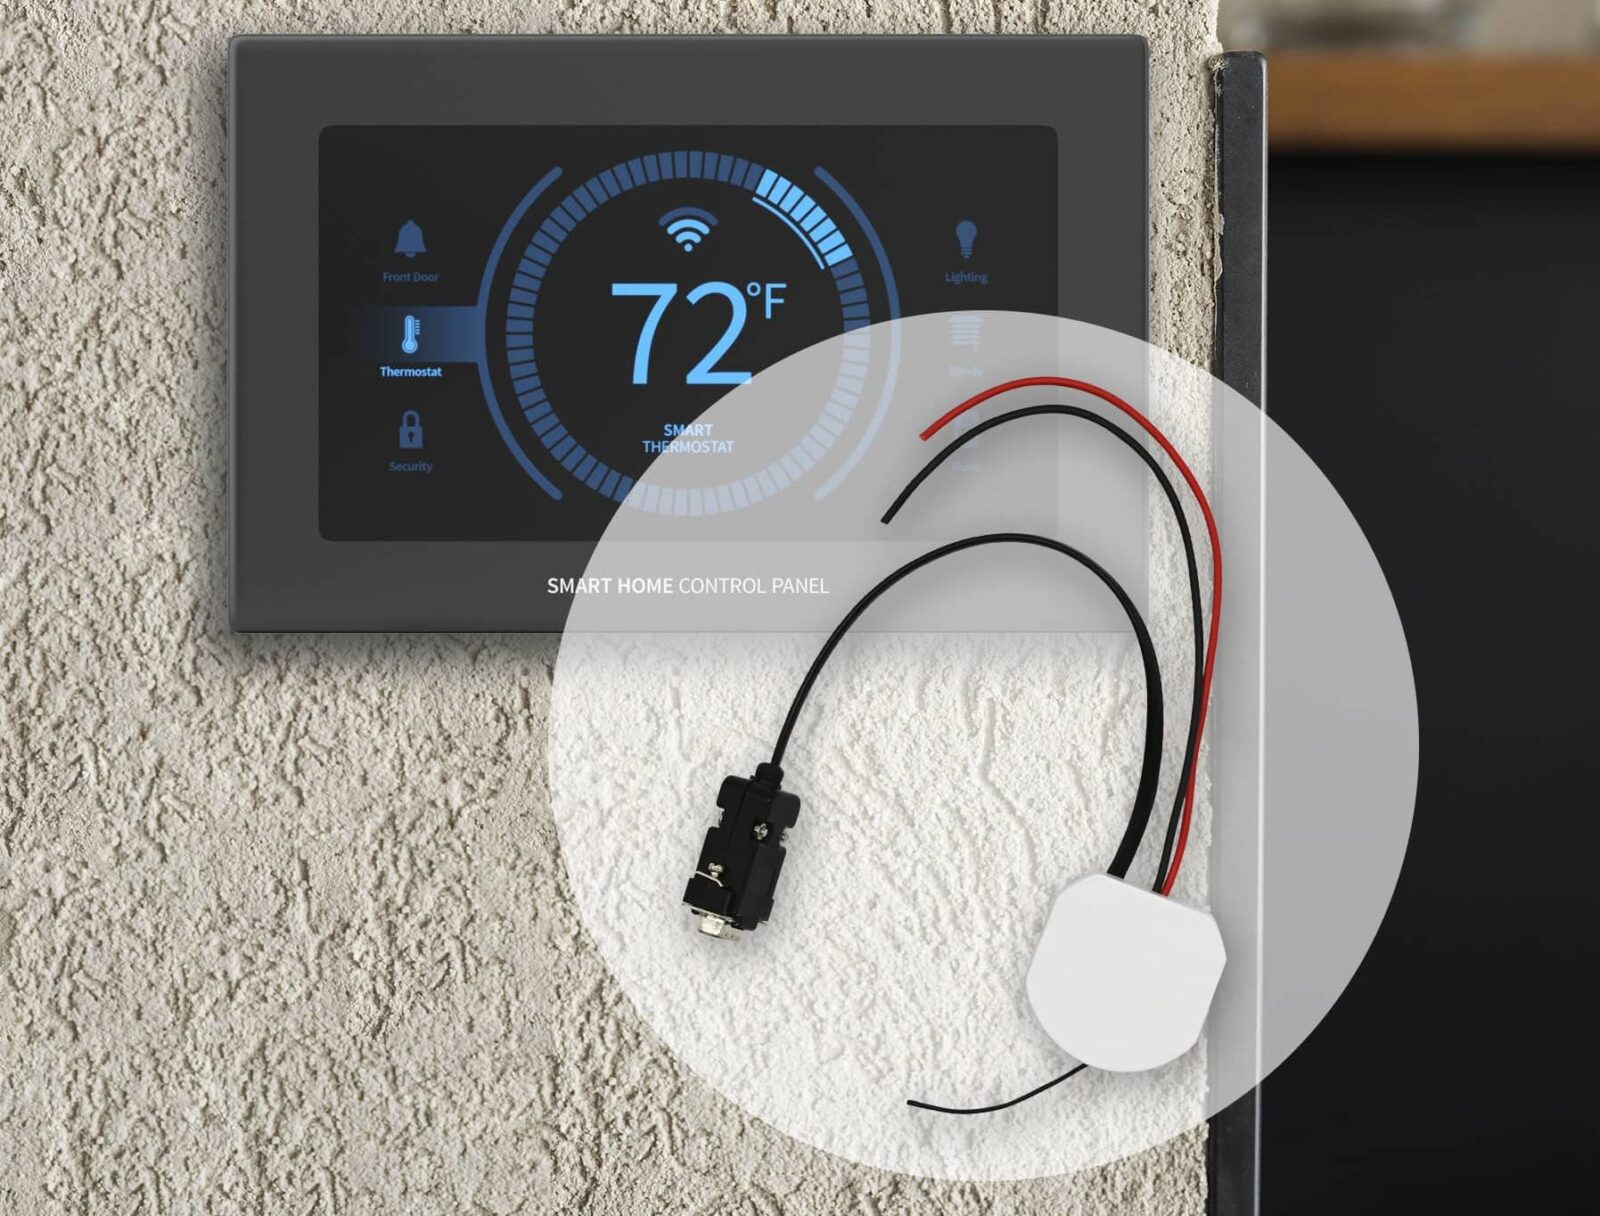
Want to create seamless communication with your Bromic outdoor heaters and your smart home automation system? Now you can! With Bromic’s Smart-Heat Link, you can pair any combination and number of Bromic On/Off or Dimmer controls with your smart home controls technology for the perfect outdoor heating solution. Compatible with the leading home automation systems on the market such as Lutron, Nomad, and Control 4, the Bromic Smart-Heat Link receives commands from your home automation system, and then repeats these commands via wireless communication to the Bromic Smart-Heat Controllers.
The Smart-Heat Link must be programmed by a licensed system integrator. The steps below are only intended to be followed by a licensed system integrator and are not recommended for a non-licensed integrator.
What is required to program my Smart-Heat Link?
You will need the following items sold separately from the Smart-Heat Link along with the included Bromic Installation Guide to ensure proper programming:
- A compatible home automation system with RS232 communication port and programming interface
- Power supply +5VDC (500mA)
- RS 232 cable (DB9 Male to DB9 Female connector)
- PS with COM port or USB to RS232 convertor
- Software installed on the PC to read and send RS 232 in hexadecimal codes, such as Docklight©
- Bromic Automation Installation Guide
Connection of Devices
The Bromic remote, whether it be the On/Off or Dimmer controller, has been pre-programmed at the factory to operate with the supplied controller. The operation of the remote and control must be checked before beginning. If the paired remote does not work with the controller, the Smart-Heat Link programming will not work. In these cases, troubleshoot the controller and remote devices using the instruction manual supplied with the controller. Initial set-up can be completed by an electrical contractor at the time of heater installation.
Pairing the Smart-Heat Link to the Heater Controllers
We recommend this step is completed by your home automation integrator/installer.
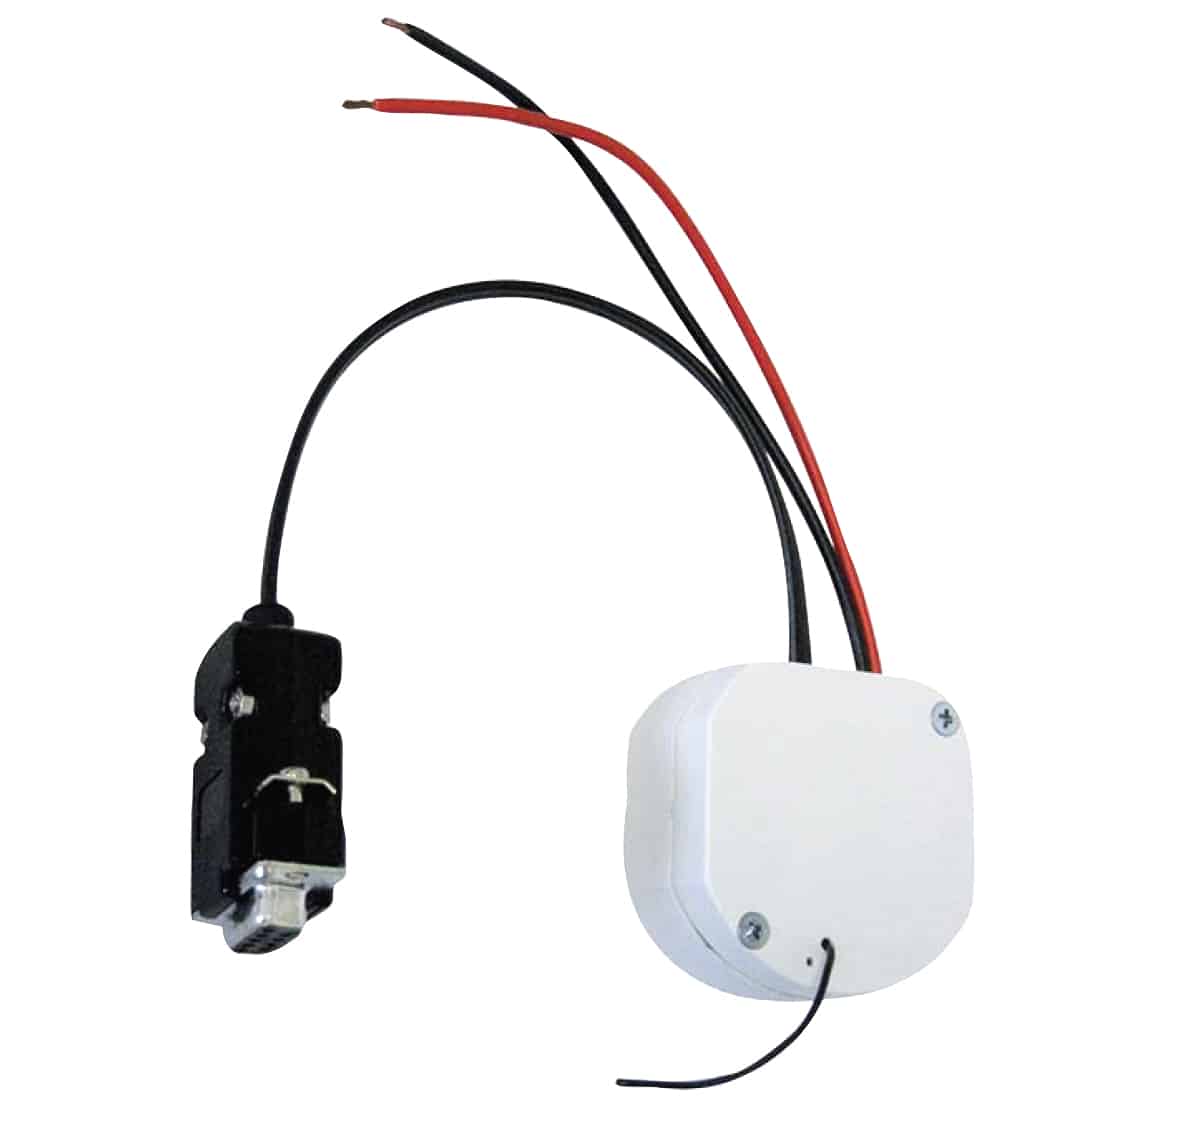
- Wire the Bromic Smart-Heat Link to a 5VDC supply, by connecting the RED (+) and BLACK (-) wires, ensuring correct polarity. These items are not supplied by Bromic.
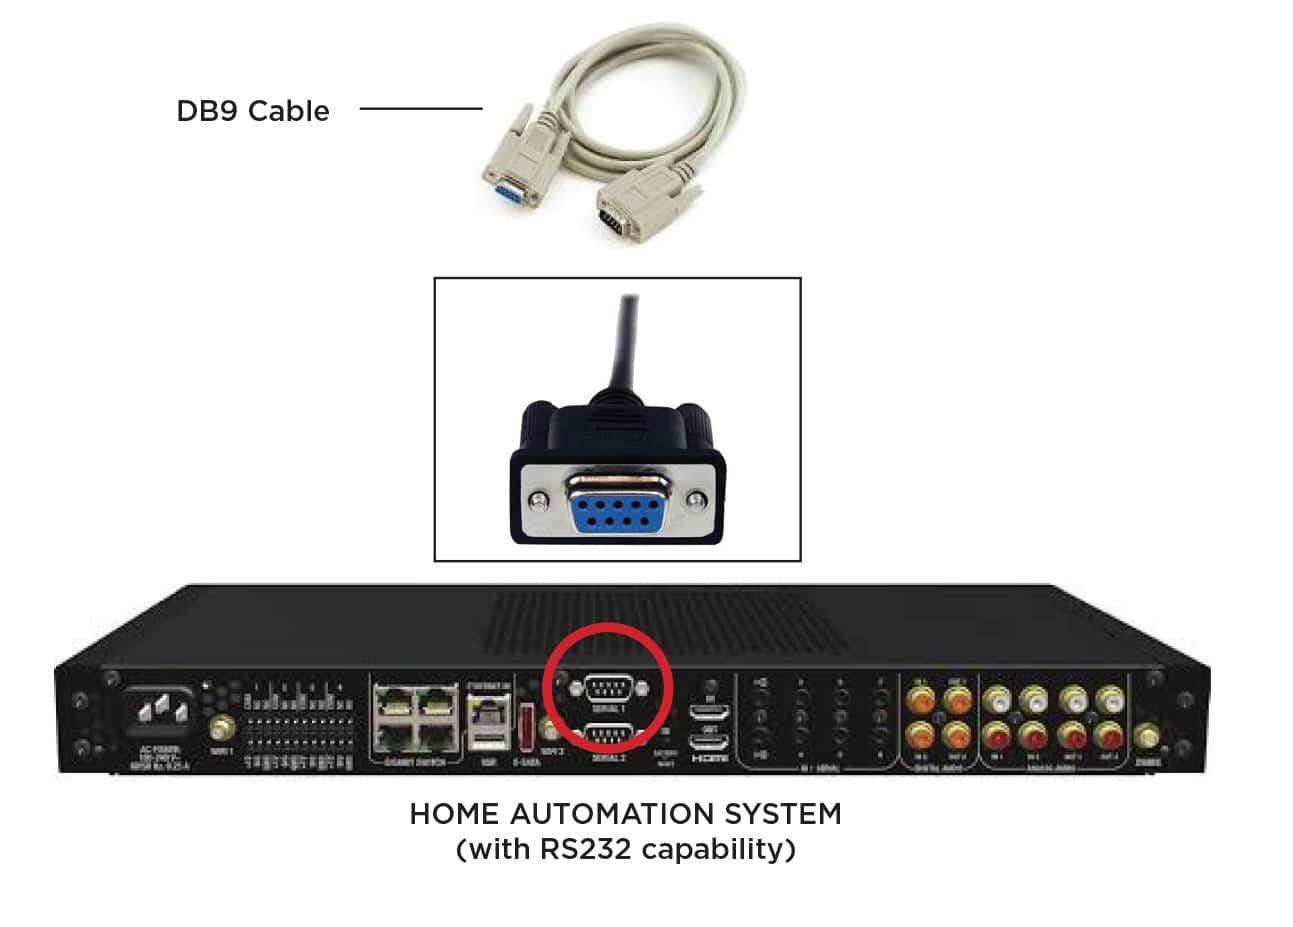
- Connect the Bromic Smart-Heat Link DB9 to the PC via the COM port or to a USB RS232 converter. Check the connections before plugging in the power supply and turning it on.
NOTE: If using a USB to RS232 converter for the first time, install the USB driver by following the instructions supplied with the USB product.
The Step-by-step Guide to Programming via Docklight©
The Smart-Heat Link must be programmed by a professional installer or licensed electrician who fully understands the Bromic Smart-Heat Link protocol using Docklight©. The command protocol is documented in the product manual as well as linked below.
Configure the RS232 port with the following settings:
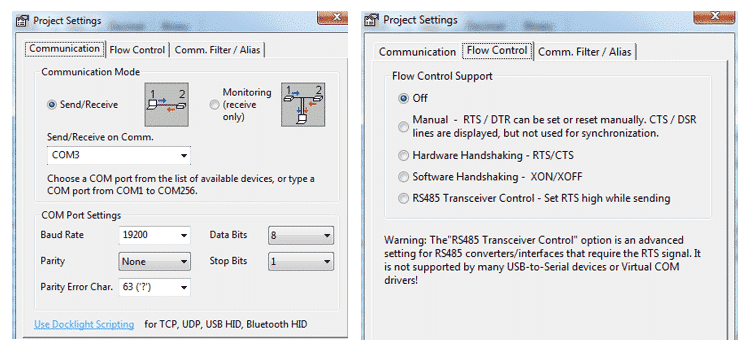
RS232 Serial Communications Settings:
- Baud Rate – 19200
- Data bits – 8
- Parity – none
- Stop bits – 1
- Flow control – none
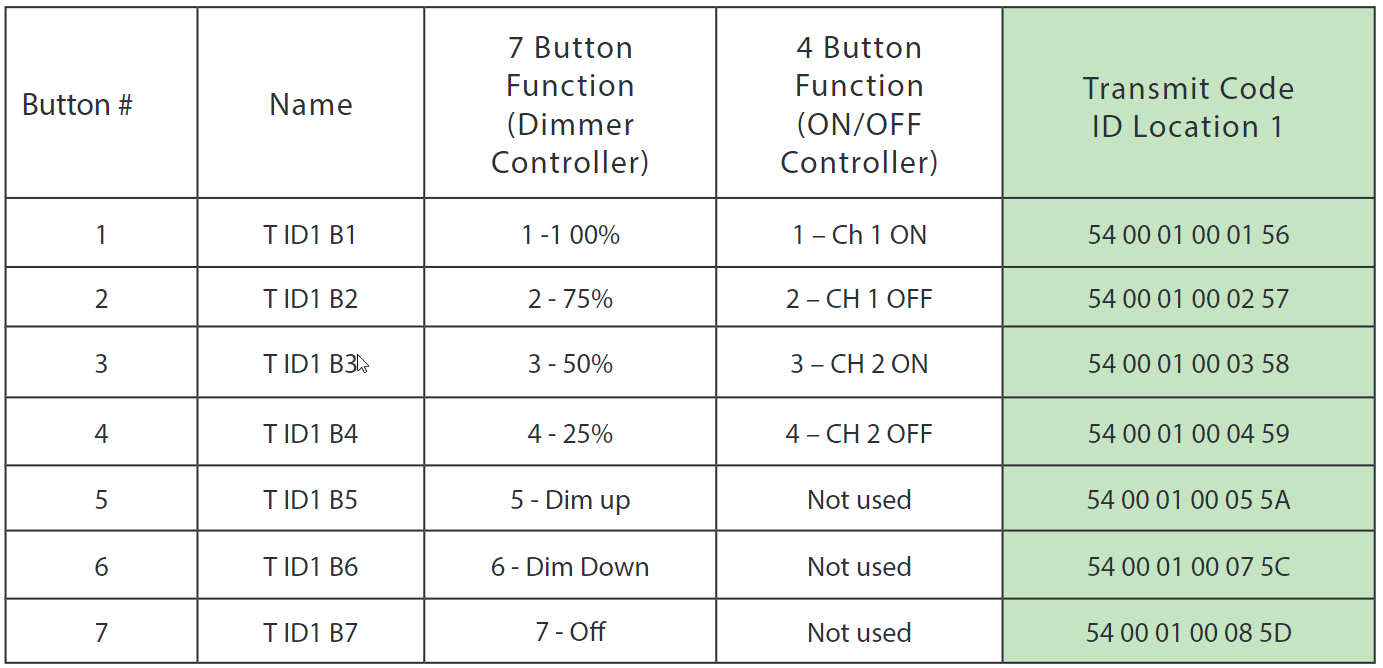
The Smart-Heat Link can learn operations from up to 50 remotes using pre-programmed codes, with each remote having 7 button operations/codes and each code being a button operation on the controller remote. The codes are stored in memory ID location 1 – 50. Each remote/controller pair will need to use a unique ID location.
The following example uses ID location 1. Refer to section “Additional Codes” for further examples and defining additional commands 2 – 50.
Follow the steps shown below:
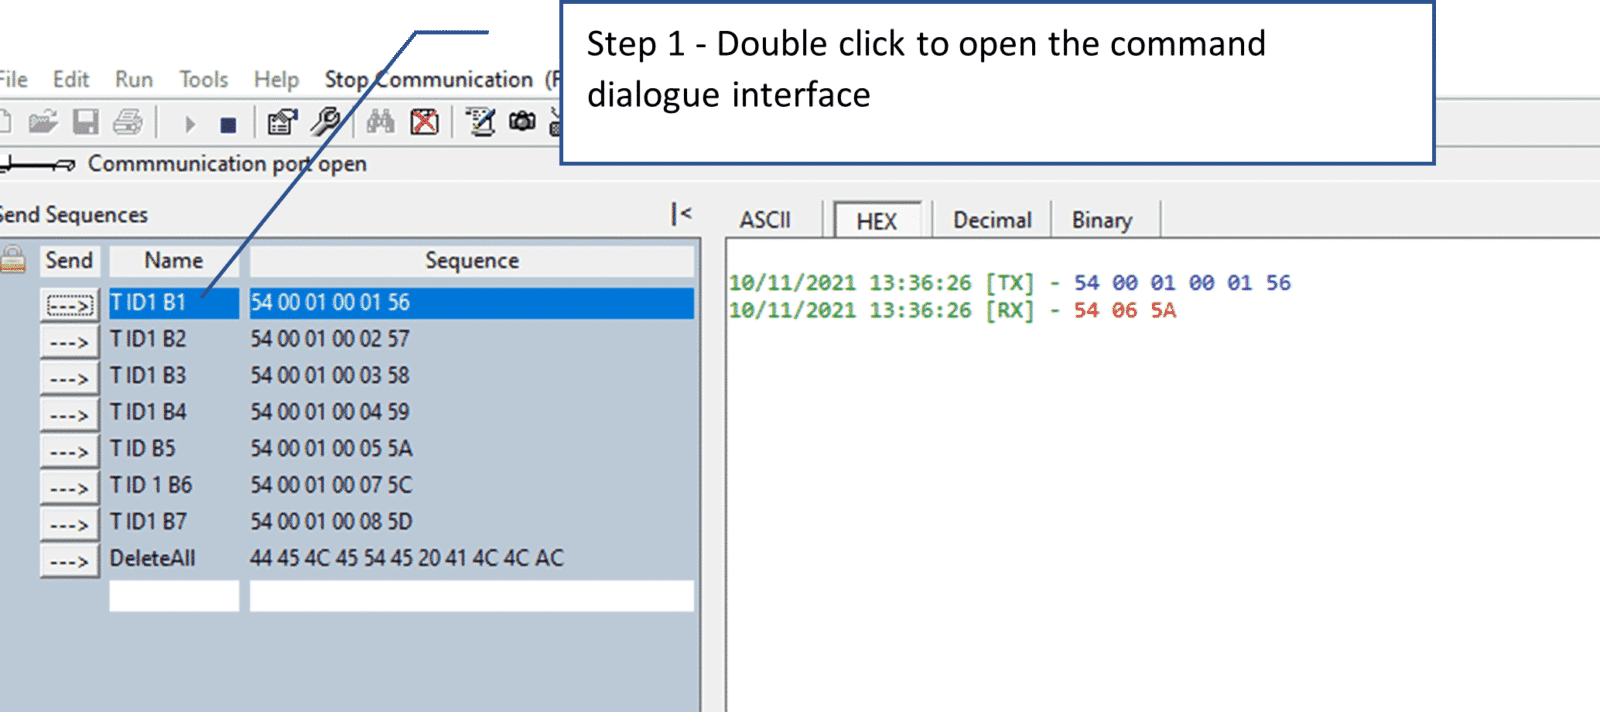
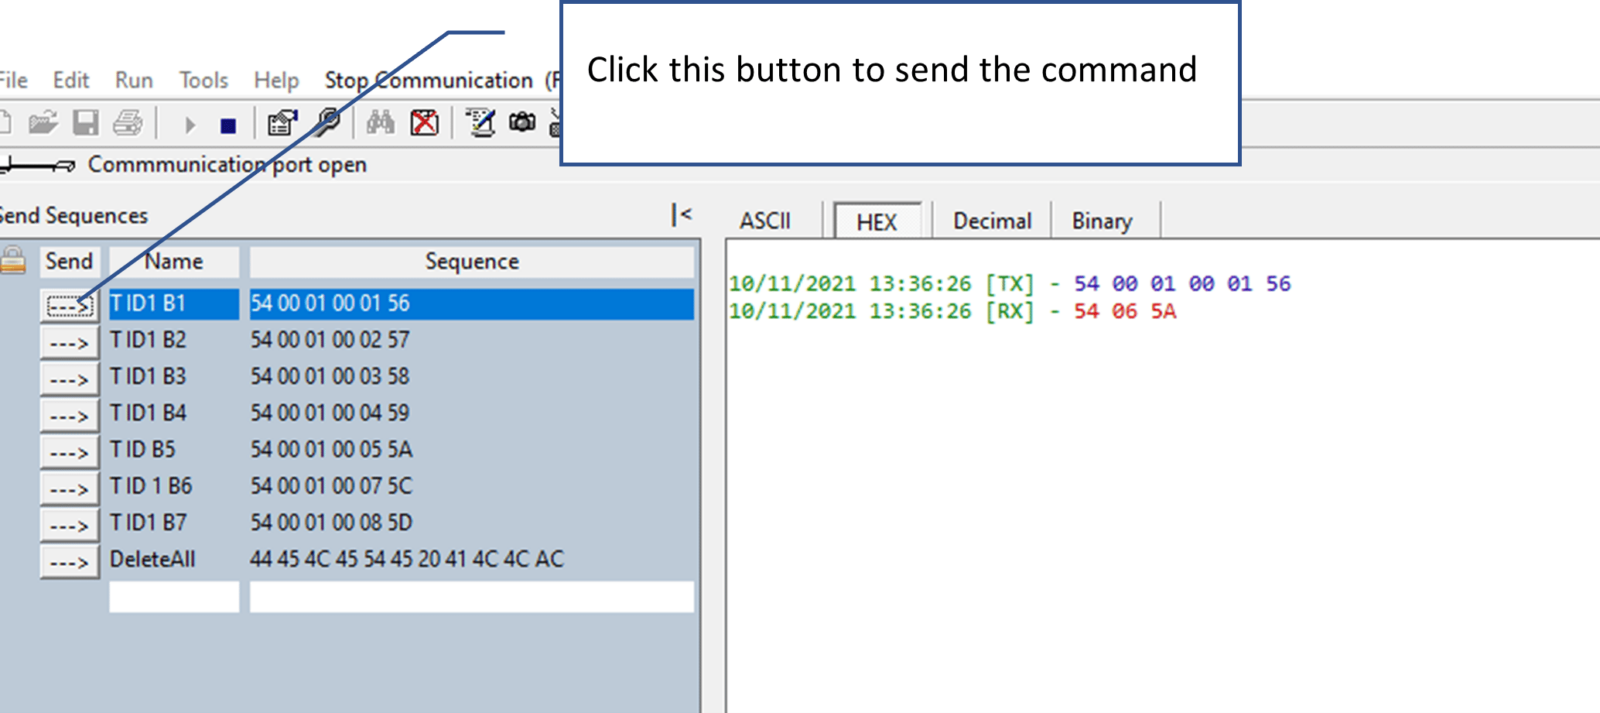
Step 1 – Double check to operate the command dialogue interface.
Step 2 – Define the Name – T for Transmit code, ID Location = 1, Button 1 operator.
Step 3 – Enter the Transmit code for Button 1 (Shown in Green on above table).
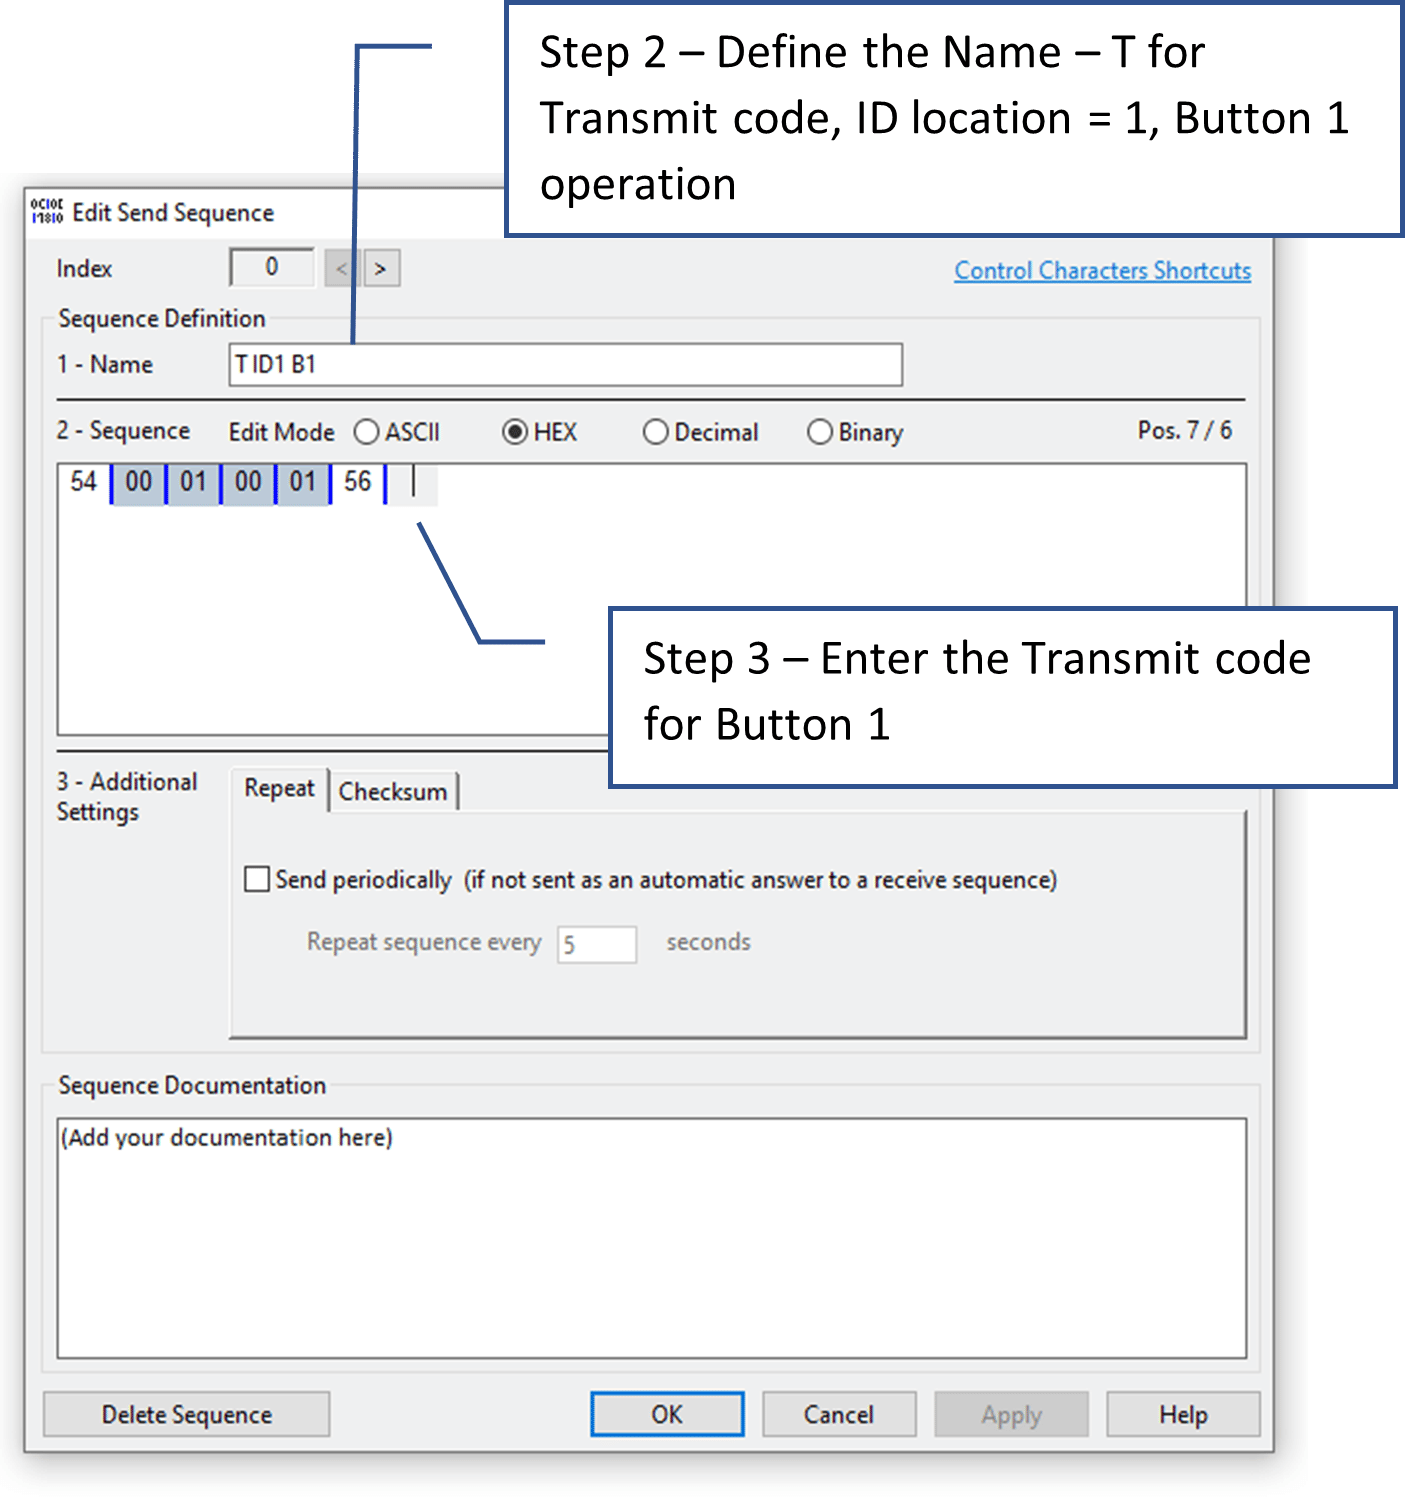
Step 4 – Click OK and repeat for all button commands (1 through 7).
Programming the Controller
Program the controller within working range by ensuring the power is on to the controller by checking the operation, guaranteeing full functionality of your outdoor heating solution. To do this, open the remote cover by inserting a flat screwdriver into the bottom recess left and right-side tabs. Turn the screwdriver to release the cover and access the P3 button as shown below.
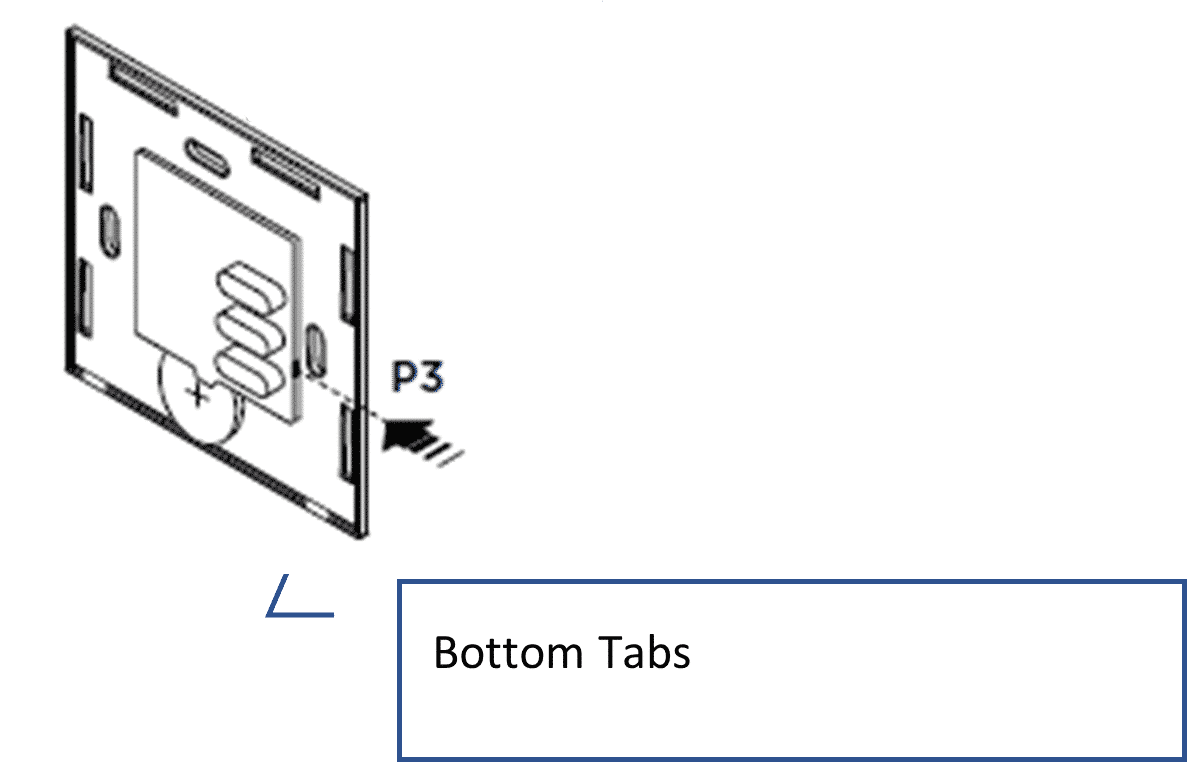
Step 1 – Press the P3 button on the remote. This sets the controller into ‘learn’ function.
Step 2 – A continuous audible sound will be heard from the controller if within working range of the controller. If you do not hear an audible sound, it is not within working range of the controller and will not work. Within 5 seconds press button 1 on the remote, and after waiting 1-5 more seconds, send command for ‘T ID1 B1’ via Docklight©.
Step 3 – The command line interface window will show the transmit code in blue and receive response ‘54 06 5A’.
Step 4 – If the received response is not ‘54 06 5A’, refer to the error tables listed at the back of the product manual for troubleshooting.
Step 5 – Repeat steps 1 through 4 for all relevant button operations as shown in the below image. For the On/Off controller, B2-B4 are the relevant commands as there are only 4 buttons on this remote. For the Dimmer controller, B2 – B7 are the relevant commands as there are 7 buttons on the remote.
Installation Instructions to Your Home Automation System
Once all remote functions have been programmed into the Bromic Smart-Heat Link device, the RS232 connection can be made to your Home Automation System.
It’s important to note that Bromic recommends your Smart-Heat Link to be programmed by your home automation integrator/installer for proper installation of your outdoor heating solution. As Home Automation systems are all slightly different, an experienced installer is recommended as Bromic technical support is limited to the Docklight© set-up and cannot assist in home automation configuration. If you have questions regarding technical details of the Bromic products, Contact Bromic’s Technical Support Team for further assistance.
Quick Download Links:
- Wiring diagram for On/Off Controller
- Wiring diagram for Dimmer Controller
- Bromic Smart-Heat Link Protocol Tool
- Bromic Automation Installation Guide